One thing you can certainly say about 'Baby' she certainly knows her own mind!
Weeks, months even, before her birthday was due 'Baby' had already decided on a theme for her birthday - Frozen, yes, you know - the Disney version of the Snow Queen (only it's nothing like the original story of the Snow Queen, of course).
She had already decided on and ordered (from me) the cake. A princess cake (she'd found a picture of one in a book). That is to say a Princess Anna cake - as Anna is her favourite character from the film.
Oh! Nothing too difficult then!!!
GULP!!
Last year I don't mind admitting I cheated. Last year 'Baby' wanted a Disney Cars birthday, complete with a Disney Cars cake - a Lightning McQueen cake, to be more specific. To my great delight, I discovered that Asda sold a Lightning McQueen cake that was made without dairy (see here)!! Happy days!! It wasn't gluten free, so I couldn't have any, but that didn't matter to me - I don't exactly need the extra calories!
This year, no such luck!
The Hub did find a Frozen cake in Tesco (also now in Sainsbury's). HUZZAH! But... it was a traditional round shape. Like so:
 |
| Perfect for a party! |
Doh!
It did come in handy though, for 'Baby's' birthday party (see ingredients here). We agreed that the Anna cake could be saved for her actual birthday - which was a huge relief for me, as with twenty odd kids invited (yeah, DON'T ask), I really didn't need any extra pressure!!
It also gave me extra time to experiment!
You can, I found out, make some standard cakes, layer them, then carve the shape of the dress, or you can use a pudding bowl. Alternatively, there was, I discovered, such a thing as a cake tin specifically designed for making princess cakes. You don't need to use one, but I find my gluten free cakes a little more crumbly than wheat flour cakes, so I decided I didn't really want to have to carve cakes into any sort of shape.
There are two tins on the market - one by Wilton, which comes complete with recipe and one by Silverwood, which doesn't come with a recipe. Guess which one The Hub ordered - yes, the one without the recipe... but it was half the price!
Cue frantic searching of the Internet, for a suitable recipe! With none to be found!
Cue fruitless wailing at the laptop!!
There were two things I was worried about - quantity and cooking time. Get the quantity wrong and you have too little or too much cake mix. I didn't want it spilling over the top of the tin, whilst it was cooking and end up all over the floor of the oven - especially as I had it professionally cleaned not so long ago! I also didn't want to get the cooking time wrong, as I didn't want to end up with either cake that was either raw or burned to a crisp!!
I wasn't so worried about the free from bit - I just intended to use my normal substitutes and see what happened.
Searching online didn't throw up an exact recipe to match the tin (even though the world and his wife seem to have made a princess cake - it's almost like a rite of passage) but it did throw up a few helpful tips:
1. Insert a skewer part way through baking - to ensure the cake cooks through the middle (the Wilton tin comes complete with a bit to do this job, but is twice the price of the other tin).
2. Cover the top of the cake with parchment paper, during cooking, to prevent burning (we speared ours with a skewer).
3. A cake of this size could take an hour to or so to bake - this one took about an hour and twenty minutes! It also took a long time to cool.
4. Covering the hair with cling film with icing is a great idea - to stop the icing getting into the hair. Covering the body of the doll with cling film is another great idea - for the purposes of hygiene! We did, in fact, use a brand new doll, too - just to make sure!
So, eventually, I decided to settle for a cake recipe we'd used before (about a year before actually)! It was this one!
It took me two attempts to come up with this - the first attempt didn't fill the tin, so the dress of the doll would have been too short, so for the second attempt I used one and a half times the quantities in the original recipe and ended up with this:
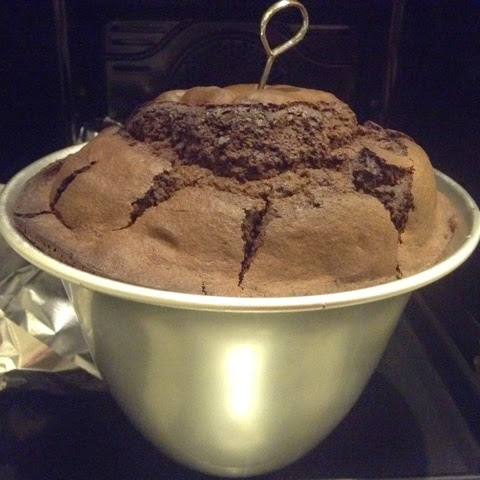 |
| Just baked! Note the skewer - to help the middle of the cake cook! |
Not exactly glamorous looking, I know, but this amount was ideal, 'cos I could cut the top off, level with the top of the tin - making a perfectly flat base for the doll.
Once the cake was cooled, it needed to be covered with a layer of butter cream. I could have made my own, I have done in the past, but I really prefer this 'Buttercream Style' icing by Betty Crocker*:
 |
| Great product - very hard to beat! |
I've found, from using it for previous cakes, that it works very well, but needs to be put on as soon as possible, in order to prevent the cake drying out - but not before it's cooled, or it will soak in to the sponge. Mind you, if you do slap it on a bit too early, and it all soaks in, it does make the cake all fudgey and yummy! In fact, I think it's worth slapping some on early to soak in and then slapping another layer on later, but it's probably supremely unhealthy to do that!
Next stage is to take the clothes off the doll to be used - wrapping her lower body and hair in cling film.
Then use a large knife to cut a hole down through the middle of the cake to make a space to insert the doll's legs. Scoop out the bits you don't need/want with a fork (cook's perks again), before inserting the doll, like so:
 |
| Taking shape! |
You may notice the waist of the doll is still exposed. I could have made the cake higher by cutting a few layers and sandwiching them with more butter cream, but like I said, being gluten free, the cake was already quite crumbly. You can, apparently, make the cake more firm and easier to carve by sticking it in the freezer for a few days, but I had neither the space in my freezer, nor the time, as I made the cake the night before it was needed!
The next stage was the bit I found the most difficult. I used some blue icing by Renshaw. I used three packs in total. It needs to be warmed up very well before use, by squeezing it in your hands, so that it doesn't crack (unlike my previous attempts at cake decoration) which I did. I rolled it out onto cling film for easy lifting (otherwise I find the icing can break apart, if you're not careful). I rolled it into a sort of blunt-ended cone shape to wrap around the doll, leaving one join at the side. This did work, to a adegree, but I still need to work on my icing technique as the join wasn't not as tidy as I would have liked - I found that the icing went too hard to mould together, quite quickly. It really did need to be done straight away!
Once the icing was on, and join made, I used a sharp knife to cut away any excess icing - ensuring a clean line around the waist of the doll and a clean edge to the skirt. I used my icing smoother to ease out any tiny creases from the cling film, but I needed to be careful to avoid breaking through the outer layer and into the butter cream. On reflection another packet of icing would have meant that I didn't have to roll the blue icing quite so thin, which might have avoided this problem.
Then came the fun part - decorating the skirt with icing pens! I used these by Dr Oetker. I love Dr Oetker products, because most are both dairy and gluten free, but do always check the ingredients!
 |
| Great products! |
The 'Apple' of the 'Fruity Icing' pack was the perfect colour for the leaves on the dress decoration, and the 'Glitter Violet' and 'Glitter Pink'of the 'Neon Glitter' were perfect for the purple edging and the flowers on the skirt. These icing gels didn't set as such, but they did remain in place and didn't run down the skirt, which was the main thing!!
My final flourish was a quick sprinkle with the 'Magic Sparkles' but I don't think they were really needed, to be quite honest!
My only problem with the decoration was time. I was running short, and only had about 20 minutes to do the job, so the decoration was not as neat as I would have liked. There are some much more stunning examples on Pinterest, but fortunately 'Baby' has NO idea, 'cos she's never seen them! So she was delighted with the cake.
Result!
 |
| Et Voila! |
AND it didn't stop her eating the cake, did it?? Demolishing it in fact - 'cos she soon wanted to remove the doll from the cake, so she could play with it. It soon looked like this:
 |
| Was it worth all that effort?? |
All that work for nothing... ah well!! I at least I feel like I've passed my rite of passage. I can finally say I have made a Princess cake.
Tick!
Phew!!
And... never again, if I can help it!! It was too stressful!!
Wish she hadn't seen the princess cakes, 'cos the other cake I made for school was much simpler and still went down well!
Wish she hadn't seen the princess cakes, 'cos the other cake I made for school was much simpler and still went down well!
 |
| Please note we're still sticking to the Frozen theme! |
But who knows? Maybe next year she'll want another Princess cake and I'll be doing it all over again! *SIGH*
The things we do for our kids eh??
*This is Betty Crocker's 'Buttercream Style Icing'. Ingredients link here. Betty Crocker also make a Buttercream Icing in a very similar tub, so make sure you pick the right one at the supermarket! The 'Buttercream Style' icing is made without dairy or soya but 'may contain milk'. That said, as far as I know we have never had any problems with it and 'Baby' has been very sensitive to the slightest traces of milk. However, if you know different, let me know, as I hate to misinform!
Links to related posts can be found on the following page of the blog:
That looks really good!! Great piping work on the skirt of that dress!
ReplyDeleteI admire what you have done here. I like the part where you say you are doing this to give back but I would assume by all the comments that this is working for you as well. bakery fayetteville
ReplyDelete